BrickEngineer: LEGO Design

LEGO Engineering for LEGO NXT and Robot Enthusiasts

Little Rover with Instructions and Code


Click here to visit HobbyTron.com

I have finally compiled building instructions for my Little Rover, which can be seen above in a 3D Rendering courtesy of POVRay.  An earlier version of this rover can be seen in this YouTube video:

Little Rover Prototype Video

Rover Design

The complete detailed building instructions can be found here in this 94-page pdf file.
Warning: it is about 9MB in size.  The design is not entirely compatible with the standard NXT Mindstorms Kit.  This design relies on two touch sensors, several 1×9 bent liftarms, and as far as I can tell from Peeron, the NXT Kit has only two.  This may require a little redesign.  Other compatibility issues and their solutions can be found in the Parts List in the instructions.

Remember to download the software DriveSmart here as well.
Installation instructions can be found in the zip file.

DriveSmart Code

The main file is called DriveSmart.rbt.  Drive Smart runs four threads:

Drive Thread
The Drive Thread (lowest one of the four) drives until a warning flag is set by one of the other
threads. It then waits until it gets an all clear message via the Wait Until Free block, and then
it starts driving again.

Bumper Threads
There are two threads that monitor the bumpers.
The reaction is only activated if nothing else is currently commanding the robot.  In this case the
bumper has been pressed and the robot will veer away from the hazard.

Ultrasound Thread
This thread monitors the ultrasound rangefinder.
The reaction is only activated if nothing else is currently commanding the robot.  When the robot
comes too close to a hazard, the robot is commanded to stop.  It then looks both ways and then turns
in the direction with more room.  If the robot is within 10 cm of a hazard on both sides, it then
backs up.

The robot can roam about a wide variety of rooms and not get stuck.
He does not detect stairs though!  So be careful.

Download: instructions and code.

Enjoy!
Kevin Knuth

LEGO NXT Motor Wiring

After posting Hacking the LEGO Mindstorms NXT Standard Motor, I received several requests for more information regarding the wiring of the motor.

The NXT cable has six wires. Below I list a table with the wires and their colors:

Color Name
White Motor 1
Black Motor 2
Red GND
Green 4.3 Volts
Yellow Tach01
Blue Tach02

The WHITE and BLACK wires (Motor 1 and Motor 2) deliver power to the motor.
If standard batteries are used, the potential difference will be 9 volts, otherwise the NiMH rechargeable batteries provide 7.2 volts. If the white wire is positive and black is negative, the motor will turn one way. If you reverse the polarity, the motor will turn the other way.

The RED wire is connected to the ground (GND). Note that in the sensors, RED and BLACK are connected to one another. This is not the case in the motors.

The GREEN wire is connected to the +4.3 NXT power supply.

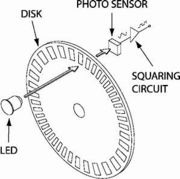
The YELLOW and BLUE wires are connected to the quadrature encoder, also called an incremental rotary encoder.

Basic Rotary Encoder

Square waves from quadrature encoder

As shown in the figure from Wikipedia above, (http://en.wikipedia.org/wiki/Quadrature_encoder) the wires return square wave pulses that are 90 degrees out of phase. If the rising pulse on TACH00 leads the rising pulse of TACH01 by 90 degrees, then the motor is going forward. If it instead lags by 90 degrees, the motor is rotating backwards. One complete square wave cycle corresponds to 2 degrees of rotation. In the diagram above, if TACH00 refers to A and TACH01 refers to B, we can see that the motor is going backwards as TACH00 is lagging TACH 01.

By measuring the frequency of the square wave oscillation, one can compute the rotational velocity. Since one cycle corresponds to 2 degrees of rotation, one cycle per second (1 Hz) corresponds to 2 degrees/sec. If you record a frequency of X Hz, then the rotation rate is 2X cycles/sec.

Note also that by tracking both square waves, you can identify quarter cycles, which gives you a resolution of 1/4 of 2 degrees, which is 0.5 degrees.

The motor speed is controlled by pulse-width modulation (pwm), which works by driving the motor with a variable duty cycle square wave. This effectively turns the motor on and off, fast. The longer it is on, the more torque it will generate and the faster it will go.

These details and more can be found in the excellent book: Extreme: NXT with a sneak peak here.

Additional details can be found in the excellent book Extreme NXT: Extending the LEGO MINDSTORMS NXT to the Next Level (Technology in Action) by Michael Gasperi, Philippe E. Hurbain, and Isabelle L. Hurbain.

Philo uploaded a comment, and reminded me that “Note that there are some internal photos of the NXT motor here: http://philohome.com/nxtmotor/nxtmotor.htm and schematics here: http://www.brickshelf.com/cgi-bin/gallery.cgi?i=1846577

Happy Hacking!

Hacking the LEGO Mindstorms NXT Standard Motor

We are working on interfacing the LEGO sensors and motors to a compact lightweight computer for more sophisticated control. Aret Carlsen brings us a video demonstrating how one can hack into the NXT Standard Motor:

See also quadrature encoder or rotary encoder at wikipedia and the LEGO NXT Hardware Developers Kit (LEGO NXT data sheets). Philo also has the pinout diagram on his page on deriving power from the Motor A port.

Additional details can be found in the excellent book Extreme NXT: Extending the LEGO MINDSTORMS NXT to the Next Level (Technology in Action) by Michael Gasperi, Philippe E. Hurbain, and Isabelle L. Hurbain.

Hacking the LEGO Mindstorms NXT Light Sensor

We are working on interfacing the LEGO sensors and motors to a compact lightweight computer for more sophisticated control.  Aret Carlsen brings us a video demonstrating how one can hack into the NXT Light Sensor:

Additional details can be found in the excellent book Extreme NXT: Extending the LEGO MINDSTORMS NXT to the Next Level (Technology in Action) by Michael Gasperi, Philippe E. Hurbain, and Isabelle L. Hurbain.

Center of Mass of LEGO NXT Motors

I am working on designing a walking machine, but I needed to know the Center of Mass of the LEGO NXT Motors.  When using Newton’s Laws to compute the forces on the system, we can treat the motor as if all of its mass is located at a single point.  The Center of Mass is the location of this point.

Hanging an NXT motor to find its center of mass.

There are several ways to find the Center of Mass of the motor.  The most straightforward way is to hang the motor from an axle placed in one of the holes.  The motor will orient itself so that the Center of Mass lies directly below the axle.  By hanging a mass on a string from the axle, the Center of Mass must lie somewhere along the line defined by the string. 

The Center of Mass Lies along the line defined by the vertical string

After performing this experiment, I placed a small piece of Scotch tape over the string so that I can keep track of where that line is.  I then cut the string off of the axle.

A piece of Scotch tape holds the string in place

Now to find the precise point, we simply perform the experiment again, but place the axle through a different hole.  This gives us a second line.  Since the Center of Mass must be on both the first line and the second line, it is located at the intersection of these two lines.

The intersection of the two strings indicates the position of the Center of Mass

The Center of Mass is very close to being aligned with the holes on the motor.  Below is an MLCAD image of the NXT motor (from Philo).  I have overlayed a Cartesian coordinate system that corresponds to that used to define the 3-D image file.  The origin of this system is at the center of the axle hole on the motors drive axis.  This is perfect for me since I will be rotating the motor and trying to compute the position of the Center of Mass after the motor has rotated through some arbitrary angle.

The dimesions of the LEGO NXT Motor

This image not only helps with identifying the Center of Mass of the NXT motor, but also in understanding the dimensions of the NXT motor overall.

Kevin Knuth
Albany NY

Matlab Package for LEGO Mindstorms

I recently received a comment on my post on controlling NXT robots with Matlab that pointed me to the RWTH – Mindstorms NXT Toolbox for MATLAB®, which is a public domain Matlab package that enables one to interface with and control LEGO mindstorms.

The RWTH – Mindstorms NXT Toolbox for MATLAB® was developed as a student project in the Institute of Imaging and Computer Vision at RWTH Aachen University in Aachen Germany. It provides a Matlab interface with the NXT brick that includes Bluetooth communication, sensor interface and motor interface. It requires a working Matlab license, of course.

The package is very easy to set up. It took me less than ten minutes to successfully test the example programs over Bluetooth.

There are some very nice motor features, such as motor synchronization and speed ramp-up and ramp-down.

I have yet to explore how easy it is to modify or extend the code, but it ought to be a straightforward matter.

The package can be downloaded from
http://www.mindstorms.rwth-aachen.de

Kevin Knuth
Albany NY

Bad Behavior has blocked 146 access attempts in the last 7 days.

Content Protected Using Blog Protector By: PcDrome.